I can't believe I actually finished my "25 Days of Christmas Mini Album" in time to post on day 26. Every year I tell myself that I am going to make one of these mini albums to record our favourite memories and this year, I did it!
Found a great Christmas hard cover book at the thrift store and used the front and back covers for the album. Inside are 25 pages - one for each of the first 25 days in December. Recording all our favourite memories and traditions that we celebrate as a family.
And... here are some of my favourite pages...
Inside the envelope on Day 11 are all the photos of my Christmas Village.
Inside the "Merry & Bright" pocket are all the photos I took at the Spruce Meadows Christmas lights display this year.
This was a great project full of fun memories and traditions and it wasn't the daunting task I thought it would be as I made myself complete a page each day!
I hope you all have a chance to document your 25 Days of Christmas memories and to all my friends, family and blog followers, thanks for all the love and support throughout this past year. Looking forward to 2012 and sharing my future crafty projects with all of you.
Monday, December 26, 2011
Tuesday, December 20, 2011
My Christmas Cloche
cloche /kloʊʃ, klɔʃ/ Show Spelled[klohsh, klawsh] Show IPA
noun
1. a bell-shaped glass cover
Last week I participated in the Christy Tomlinson 12 Artsy Christmas Ornaments; an on-line class featuring 11 teachers and 12 amazing projects. One of the projects that I fell in love with was the Holiday Glitter Cloche by Shea & Debbie. I bought a vase at Michaels for $3, the wooden base and ball topper for $2 and I had the rest of the stuff to complete the project in my craft bin. I love little trinkets and glitter and what better way to showcase them than in this adorable Christmas cloche. This is my version with a few close-ups.... and I love it!
The snowman is a vintage ornament that has been in our family since my brother and I were small children so I thought this would be a great way to keep him safe and admire him over the years!
I decorated the mini trees with glitter snow and red stickles, adding a silver star to the top of the larger tree.
... Love the snowy picket fence!
... And you can never have too much glitter and bling. I used my silver glitter on a wooden ball for the top of the cloche and a Teresa Collins Blingage for the centre ornament.
Gather up a few of your favourite small treasures and create a cloche of your very own to admire over the holiday season.
Monday, December 12, 2011
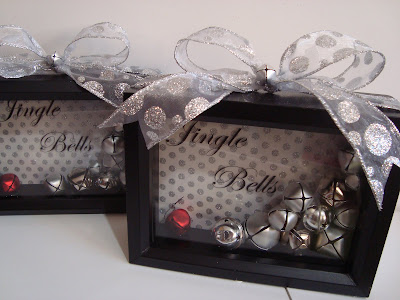
Jingle Bells Shadowbox
I love the sound of bells at Christmas time... so with a few items purchased at my local craft store, I created my own Jingle Bells shadowbox. Last year I found a huge assortment of bells in the sale bin at the fabric store so, not having any idea what I would do with them, I bought 10 packages, various sizes and colors! This year, they came in handy for my shadowboxes. I made the first two in silver... very easy and a lot of fun!
All you need is a shadowbox frame from Michaels, background paper, transparency paper for your sentiment, bells, 2" wide Christmas ribbon and a hot glue gun.
An hour later this is the finished project. You can create them in any color to suit your Christmas decor. I love the red and white candy cane stripes so this will be my next creation with red bells!
Monday, December 5, 2011
My Snow Day!
OK... so this is what I woke up to yesterday! (View from my bedroom window). Most of you will think I am crazy, but I love this wintery weather as it gives me a great excuse to stay inside my warm cozy house and create! Sometimes I think that I have more craft supplies in my scrap room than the local store so no need to venture out in this wintery weather to go shopping... so I spent the day doing what I love to do... create!
I alternated between my scrap room and my sewing room... I know I'm a very lucky girl to have two rooms that I can call my own! Here are a couple of projects that I finished, with more in the works.
Christmas cards finished and ready for mailing.
Christmas Stockings for the kids...
Finished off the rest of my glittery ornaments.
Finished up my Graphic 45 Journal in a Box class that I took at Scrapbookers Paradise.
Some gift envelopes I made from brown packing paper. These will be filled with gift cards and money for friends and family.
And... finally... decorated the Christmas tree in the living room.
... and the Christmas tree in the family room.
That's enough for one day! Still lots more decorating to do but tomorrow is another day with plenty of projects still to finish.
Saturday, November 26, 2011
All That Glitters...
... Is Not Gold... In fact, it's Silver!
I love silver glitter, so much so that when I last checked my stash, a have four bottles... yes, all silver! I had the perfect project in mind to use up some of this over abundance of silver glitter.
While shopping in a store in Las Vegas this past fall, I came across some ornaments that I fell in love with, only I thought that they were over-priced and very plain (no glitter) and I could recreate them using my own ideas and my silver glitter.
I started with some large pressboard hearts that I found at Michael's in the sale bin for $.49 each so I bought them all.
I covered each heart with old book paper and sanded the edges.
I used my cropodile to punch a hole both at the bottom and top of each heart.
I stamped a "crown" stamp on the front, adding some silver rhinestones.
I painted the edges with some glue and then dipped them into the glitter.
I also got the hanging bobbles from Michaels and added one to each heart along with some ribbon to hang the ornament.
I had so much fun making these that I went back to Michaels and found the smaller hearts and continued to make some more...
I am now completely covered head-to-toe in silver glitter and, as my friend Deb kindly pointed out, I'll be finding that stuff in my craft room in March!!!
Take some time and check out what others are creating this holiday season at Where Women Create.
Subscribe to:
Posts (Atom)